Tuesday, January 21, 2014

Making Do

As I’ve said before, moving every few years has its perks and challenges.  Trying to maintain (and continually improve) a sustainable, eco-friendly, low-budget, simple, organized and beautiful home on top of that can be, well –  extra challenging. 

Each home we move into has its own style, floor plan, room layout, and needs.  For me, the process of organizing and decorating a house (rental or owned) is often a frustrating and exciting endeavor.  Over the years I have learned a few things that have helped me maintain my sustainable sensibility while also creating beautiful and functional spaces. 

Here’s a peek at the guidelines I use to determine if something is worth the money, time, and effort…

Lexie’s Guidelines for Home Décor:
1.     Is it multifunctional?  Can I use it in more than one way in different spaces?
2.     Can I change it up? (paintable, switch out fabric, slipcover, etc.) 
3.     Does it break down or fold up for easy storage? (in case it won’t work in a particular space)
4.     How big and heavy is it?  (my husband’s favorite as I like to change up our rooms a lot)
5.     Is it inexpensive enough that I can sell or donate it if necessary?
6.     Does it fit in with my blended décor styles?  (cottage, rustic, farmhouse, beachy, simple, modern)

These “rules” help to ensure that our home isn’t filled with large amounts of oversized, heavy, multi-colored, miss matched, or expensive décor.  Now, there’s nothing wrong with any of that if that’s what you like, for us though moving every 2.4 years (our current average), it helps to keep the guidelines in mind before each and every purchase. 

So now that we’re unpacking and starting to organize and decorate house #7, I’ve been thinking of these guidelines quite a bit and I realized that #1 (Is it multifunctional?) is one of the most important rules I follow.  As I’m working in a space I’m constantly thinking about what furniture and décor we already own that I can use...what do we have that I can "make do" with?

This past week I moved all of our extra décor (that I haven’t placed already) into the basement so that I can “shop” my own home. 

Ready for some free shopping!

Yesterday I was working a bit on our sunroom.  We’ve never had a sunroom before...vaulted ceiling, french doors that lead outside, floor-to-ceiling windows on every wall, and a big opening that’s connected to the main family room.  It’s a beautiful space and also a little nerve-wracking trying to determine how we want to use the room and how the furniture placement will work. 

Two of the pieces of furniture I’ve decided to use in the room are a pair old wooden patio chairs I picked up at a thrift store in NJ a few years ago.  Originally purchased for our covered front porch in our NJ home…

Originally stained a reddish color, my mom helped me paint them with leftover exterior paint - BM Swiss Coffee

…and then used outside on our deck in VA. 

Left outside...rain or shine, snow or sleet.

Having been left outside for 3+ years, they were dirty, spiderwebbed, and rusty.  So when the movers were unloading them from the truck a few weeks ago and I said “Oh put those in the sunroom” – I got a sideways glance from Mr. MacGyver (nothing but love, I tell ya!)  

Yesterday I scrubbed those babies clean with some Dr. Bronners…

My cleaning arsenal


Half dirty, half clean
All cleaned up

 …and then painted over the rusty springs with some rust primer. 

Not the most eco-friendly I know, but it was leftover from a previous project and it does the job well.


Cleaned and primed

 I still need to go over the springs with some white metal paint and make some indoor slipcovers for the cushions. I’ll be sure to post more pix once the sunroom is complete.

So "making do" is by far one of my most used "tricks" for sustainable décor.  How do you “make do?” 

Lots-o-love,
Lexie


Friday, January 17, 2014

Upcycled Bench: Chalk Paint DIY Upholstery Redo Project

I bought this bench at a yard sale in June of 2013 for $2.


After I removed the fabric and took over sanding the wood (you do not need to sand when using chalk paint; however, I didn't know if I would be distressing this piece, so I sanded down any rough spots for a smooth, clean, painted look), I painted the wood white with two coats of chalk paint. 


After MUCH debate and polling on social media because I was so torn, I decided on the blue fabric that I bought at IKEA during the summer of 2012. 

Choosing the fabric was a very hard choice because I absolutely loved both looks. 

However, before I could upholster this piece, I had to buy a replacement piece of wood for the seat as the original wood had deteriorated over time. To save time, and so I didn't have to pull out my saw during our Northeast winter here, I had our wood cut to size (a wonderful complimentary service) at Lowe's as my girls and I watched from the sidelines.  


Once the wood was cut, I upholstered it by simply placing the fabric over the padding while pulling the fabric taunt and even while stapling it on the backside of the wood.


After I painted the wood and before I attached the cushion, I applied two coats of soft clear wax over the chalk paint. 


Here is a before and after look:


What do you think of the fabric choice? Do you think I should take this redo a step further by distressing the wood? I would love for you to share your thoughts!

Happy Upcycling!
Priscilla

Wednesday, January 15, 2014

Wordless Wednesday

Our kitchen revamp...sustainable style!

Before...


And after...


Happy Wednesday!

Lots-o-love,
Lexie

Monday, January 13, 2014

Distressed Painted Furniture Redo: Yard Sale Table Upcycled with Chalk Paint

During one of our many yard sale adventures, Lexie and I found this table priced for $1.00, and I immediately envisioned a distressed, antiqued beauty.


I initially envisioned this table painted white, distressed and finished with a dark wax so that the detail would be accentuated. However, after painting it white, my vision changed.

Before I started painting, I thoroughly scrubbed the table with white vinegar and water (50/50) while scraping the grime out of the crevices. I then sanded the top of the table several times while lightly sanding the rest of the table before painting a thick coat of white chalk paint. You do not normally need to sand before painting with chalk paint, but what you cannot see in these pictures is the small amount of water damage on the table top. The wood was a bit too swollen in areas to not sand. 


After I painted a thick coat of white chalk paint, I thought that it needed more than a distressed and dark wax finish, so I decided to have a bit of fun with it as I painted the second coat blue (most chalk paints go on thick, but I did need to touch up areas after the second coat dried thoroughly). 

I then distressed the entire table with sand paper and extra fine steel wool with the intention to expose both the white paint and natural wood.

The pictures below are before I applied the clear wax. If you compare the images in the collage below with the first picture in this post, you can see how the blue got brighter after I applied the wax.


After I distressed the table, I applied two coats of clear wax (I may apply a third coat to the table top because of all the daily use it will endure. I must admit, however, that I still have the urge to add a dark wax antiqued finish. 
What do you think? Should I stop at the clear wax or go for a more distressed/antiqued finish that the dark wax creates? 

Happy Painting!
Priscilla 

Monday, January 6, 2014

My Thrifted Dining Room

Happy New Year!  I hope this finds you happy and healthy as the new year unfolds. 

Today I’d thought I would share a space from my past.  A little background first: due to my husband’s job we move every 2-4 years, which has its perks and challenges.  Since our wedding in 2000, we have lived in seven different houses in five different states.  (phew, I’m tired just typing that!)

The perks are obvious – we have seen much of this beautiful country, met amazing people along the way, we’ve lived in various climates and types of topography, and rented/owned different styles and ages of houses. 

But as a thrifty & sustainable decorator – let me tell you – moving from dwelling to dwelling is not without it’s challenges: too much furniture & too little house, too little furniture & too big of space, paint colors in rentals, ugly 80’s brass fixtures (on a side note: why are these fixtures still available for purchase today??…I think they should be banned from production – just sayin’), odd room shapes, windows without window treatments, windows with window treatments (which usually, of course are not my style), etc. etc.  Sigh.  But I do love me a good challenge and with Mr. MacGyver (aka: my hubs) by my side, I’m usually able to make a space work for us reusing existing furniture and décor, and/or buying used pieces to be transformed.

Which leads me to today’s post: “My Thrifted Dining Room.”  In six of the seven homes we’ve lived in we have NOT had a formal dining room – bizarre right?  But honestly, I’m not really a formal dining room kinda gal, so it has never bothered me.  And yet, in our home (three homes ago), we were met with a very obvious and very unattractive dining room space. 
 
Please note: this was the previous homeowner's decor.
So knowing that we would be: 1. Leaving this house in 3-4 years. 2. We may not have a formal dining room space again.  And 3. We don’t typically use a dining room…I knew I needed to makeover this room as inexpensively as possible.  Hello thrift stores, yard sales, hand-me-downs, Craigslist, and trash picks!

So other than the paint and the window blinds, this room was completely redone using thrifted finds.


So here's some deets about the space:

1. The table was a $20 Craigslist find.  I intended on refinishing it, but never got around to it before we moved.  I ended up selling it for $100.

2. The white dining chairs were also a Craigslist find.  The set of six ran me $20 each.  They also got sold for $30 each.

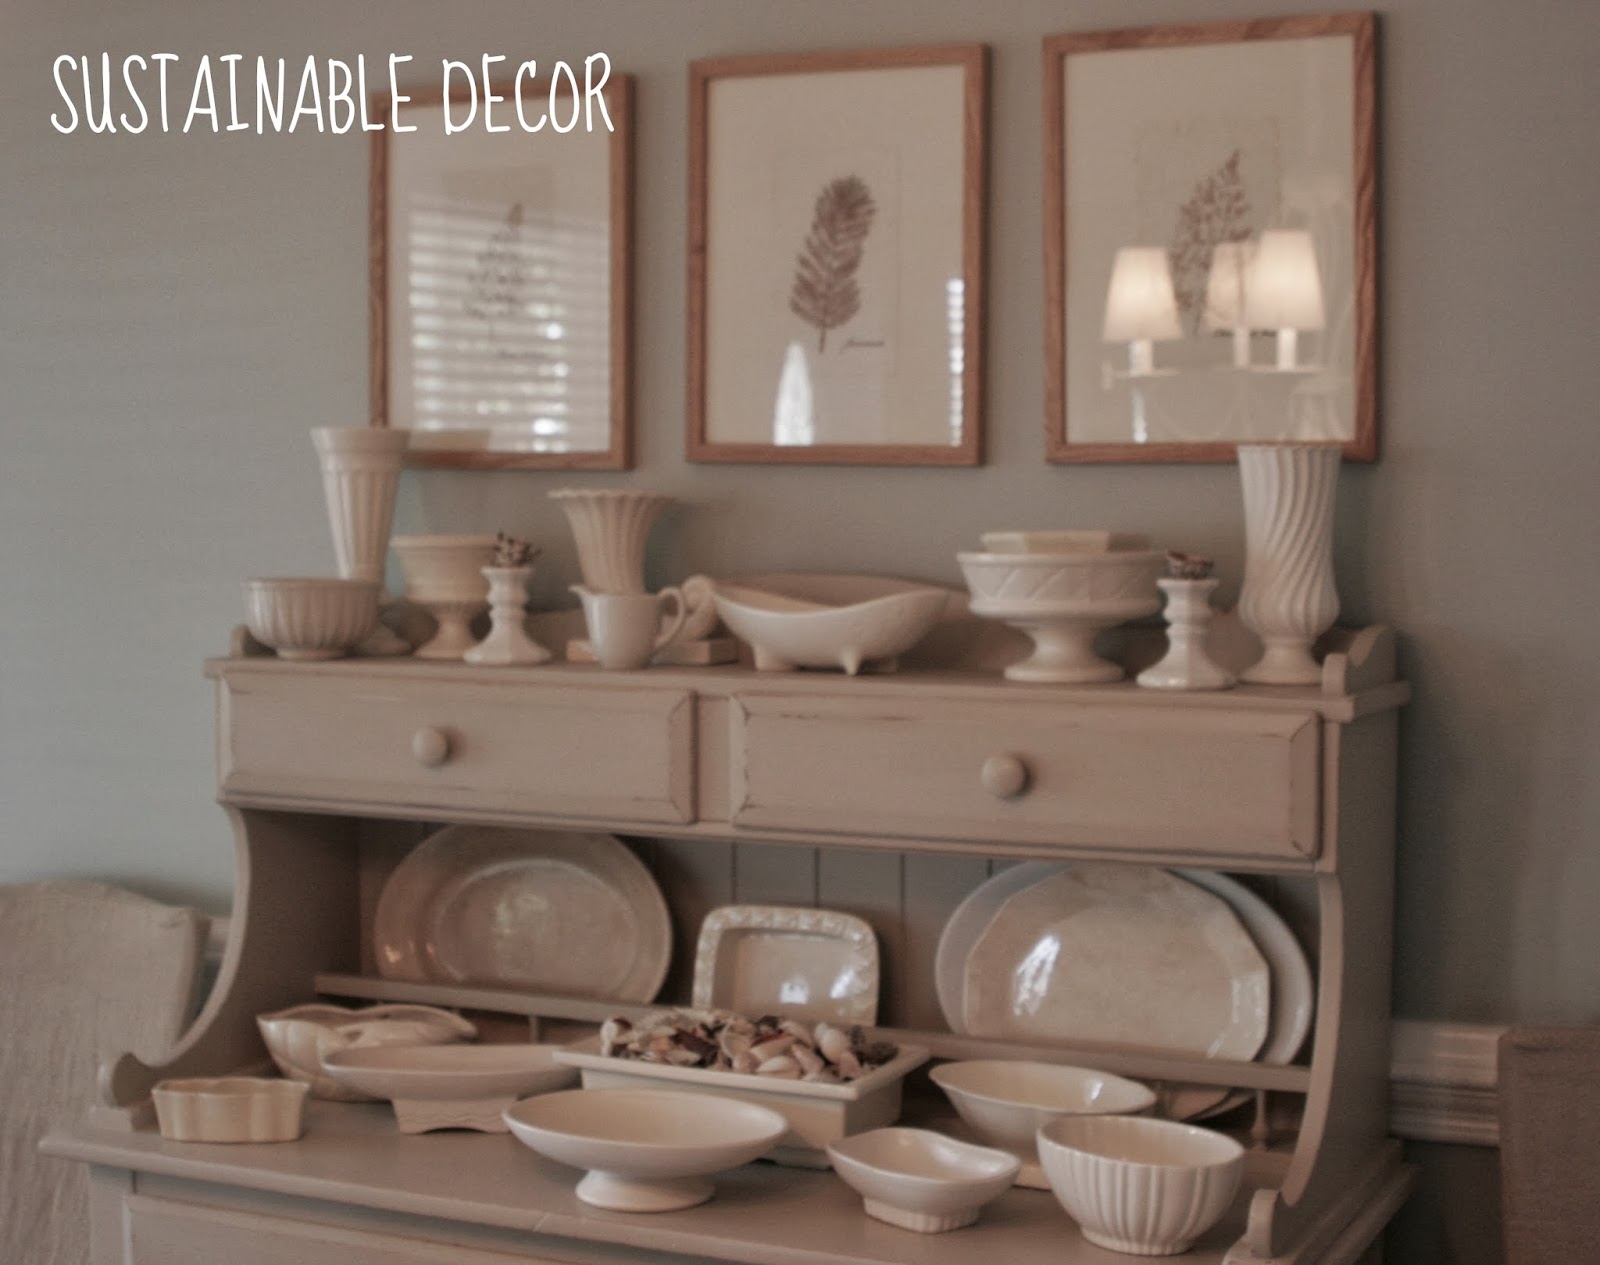
3. The hutch was a Salvation Army find for $50.  It's a vintage piece and my hubs and I LOVE it: solid wood, not too heavy, and versatile (it's been used in our entry way, in two different guest bedrooms, as a TV stand, and of course in this dining room).

4. The two slipcovered chairs on either side of the hutch are hand-me-downs from my mom.  They're antique oak dining chairs and are covered with yard sale found slipcovers. 

5. The lighting fixture was purchased with the home and previously resided in the eat-in-kitchen.  Originally it was an orangish-rust color so a little white paint and some thrift store purchased shades and she looks brand new!

6. The artwork above the hutch was a yard sale find: $3.00 a piece.

7. All of the white pottery and ironstone pieces on the hutch were found in either thrift stores, antique stores, or yard sales.

8. The burlap runner on the table is just that, a piece of burlap I found in a bag of linens purchased at a hospital thrift store.  The blue runner was picked up by my mom at a yard sale.

9. The oval mirror was handmade by my great grandfather and passed down to me a few years ago after my grandmother passed away.

10. The "sticks" in the corner were free from mother nature and whitewashed with some craft paint.  They're sitting in a metal bucket purchased from Goodwill.

11. The bird art is handmade by yours truly.  I trash picked the canvas which previously was painted with a-not-so-good version of a beach landscape. I primed the whole thing, painted it with some leftover taupe paint, found the bird silhouettes on Google images (printed, cut, traced, and painted in white craft paint), and free handed the branches.

Handmade and free artwork

12. The three white mirrors were Goodwill finds: $50 for the set of three.  Apparently they're handmade and from Pier One Imports (so says the stickers on the back of them) and were originally painted red, blue, and yellow.  Here's what they looked like when I purchased them:

Handmade mirrors from Pier One purchased at Goodwill
So, all in all, I like how this space turned out and I like even better that I was able to put it together for cheap using secondhand goods.  And now in our current dwelling (house #7, state #5) we again don't have a formal dining room so all these pieces have found new life in either new rooms of our own or passed on to new owners...and the cycle continues! 

Happy thirfting to ya!

Lots-o-love,
Lexie


Friday, December 20, 2013

DIY Upcycled Painted Mirror: Annie Sloan Chalk Paint and the Lesson I Learned

After my mother-in-law saw a few of the mirrors that I've been accumulating for future projects, she asked me to paint one of the mirrors that I had for her closet so that she can use it while getting ready in the mornings.


After receiving the dimensions of her available wall space, I asked if she liked the mirror below that I purchased at a yard sale for $5.00.


She loved it! However, before I picked a paint color, I asked her several questions while getting a feel for the look she wanted without revealing the color that I was intending on using after considering her responses.

After speaking with my MIL, I knew that Provence by Annie Sloan was the right color, but before I started painting, I wiped the mirror down with white vinegar and water (50/50) and let it fully dry before I began with the first coat.

As you can see, there was a lot of dirt to clean off.


I applied the first coat with a brush while trying to get into all the nooks and crannies. However, after that dried, I had to go back with a partial second coat while covering the missed spots in the groves.


When painting this mirror, I did not mix water with the AS chalk paint like I had with my first two projects; however, when painting my next ornate mirror, I will mix three parts paint to one part water for better coverage. I feel that not watering down this chalk paint caused it to go on a bit too thick while I lost some of the detail.


Overall, I still think that it came out beautifully, and my MIL loved it, so it was a total score! 

Since this project, I've purchased several more antique mirrors and have even saved a couple mirrors from the landfill while trash picking, so I will have 12+ mirror projects in my not-so-distant future to share with all of you.

Much Love!
Priscilla